Sunday, October 31, 2010

At the aerodrome today.

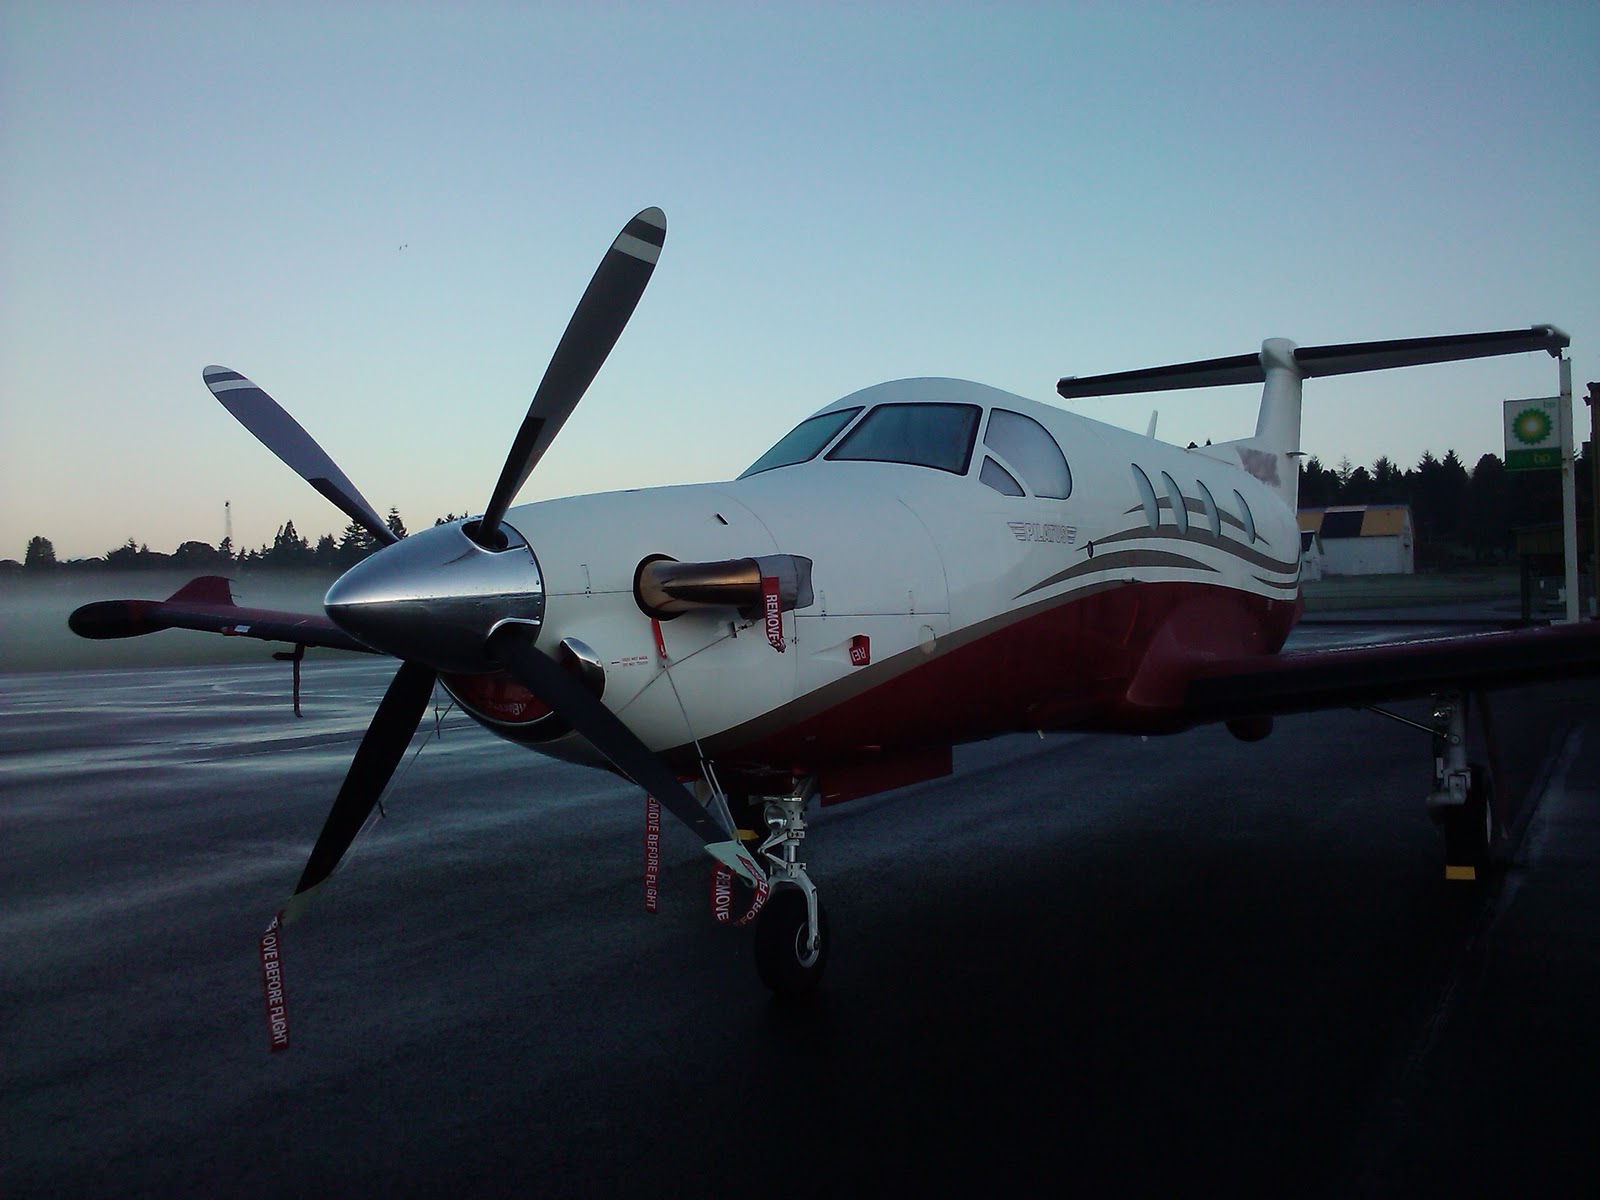
This morning while walking my dog by the airfield I spotted this sleek 9 passenger single prop plane on the tarmac and wandered over for a looksie. Turns out to be a Swiss made Pilatus PC12, powered by a 1,200 hp Pratt & Whitney turboprop. Cruising speed is 312.5 mph with a service ceiling of 30,000 ft. It's designed for the alps; can land in less than 1,000 feet and take off in less than 1,500 ft.  Later, just before dusk, Doc and I were walking by the field again...and lo and behold, there are people getting ready to take off in that bad boy. We sat down on a picnic bench and filmed the take off. Afterwards, I chatted with the owners wife for a bit and learned that he started flying when he was 68 years old. He is my new hero. I'm invited for a tour to check out the interior later this week.


Update: I stopped by the airfield last night and got to meet the pilot and co-pilot and received a quick tour of the cabin...very cool avionics - glass panel style. Leather chairs and seating arranged for just 6 passengers, so it's pretty roomy inside. The plane is in town all week...they're gonna call me if there is room for me on a tour up the Gorge later this week. Fingers crossed.

Monday, October 18, 2010

Flight Three - Ground Reference Manuevers

We had some fog this morning, but luckily it was everywhere except over Pearson, so we were able to fly today.

Pre-flight Briefing
Todays lesson is all about ground reference navigation. Theresa reviewed some more weather references. Mostly how to call the meteorologist at Boeing Field in Seattle to get highly detailed weather info. and other restrictions (we got notice that the President and Vice-President would be in the area tomorrow). It is also where you file your flight plan so if anything goes wrong and you don't show up at the predicted times, they know when & where to start searching for you. Theresa then reviewed what we would be doing for the ground reference navigation exercises. Mostly it was about following roads directly above and turning in a big left-handed series of turns to complete a square following four roads picked at random. Then I would try to place the plane 1/2 mile parallel to the roads at 1,000 ft AGL. performing the same square (just 1/2 mile outside).

Walk Around
Again, I was heavily assisted by my instructor to complete the walk around. It went much faster this time. Next time Theresa is going to set it up so I perform the check solo next time. Once that is going well, I can save on instructor time (and cost) by performing the walk-around before the instructor shows up.

Flight 3, Lesson 2
Theresa helped me perform the start-up check list and then we were ready to taxi to the runway. A quick visual check of the windsock, and we were off to runway 26. I'm getting better at taxiing, though I'm still tending to ride the brakes a bit. Theresa helped me with the run-up and take-off checklists once more. Then we were taxiing to the hold line - Theresa is still handling all the radio chatter between us and VUO or PDX.

I got to takeoff unassisted again. Everything seemed to go a bit smoother this time. Nice take off and we were heading north. The fog was starting to move into the area, so we headed north a bit sooner than usual. Theresa had me start by lining up over I-5. Once we were far enough north, we started the ground ref. nav. - doing a series of left hand turns (it's easier cause that's the pilots side window), following roads that continued to the horizon as much as possible. The key is not to spend too much time staring at the ground, but translating the ground info out to the horizon when possible.

There is a lot to keep track of, and maintaining a steady altitude during all the turns proved to be the big challenge. By the time we were headed back to Pearson, I had stopped drifting out of my assigned altitude during turns.

Theresa also spent a fair amount of time showing me different references to see the wind speed and direction - steam from smokestacks being the best.

As we approached Pearson Field, I needed to line the aircraft up one-half mile off to the north. We have a great visual reference in a water tower that lies 1/2 mile off center and is very hard to miss. Once we are parallel to the end of the runway, we decelerated and began our slow turning decent to the runway. Once we were less than a 1/4 mile out, Theresa took control and brought us in for a landing.

Next Lesson
Theresa said that next time we will be doing circles and s-turns as we continue ground reference navigation. Landings are still a few lessons away.

Hours of flight logged this lesson: 0.9 Dual Received (DR)
Cost of this flight lesson: $141.71

Wednesday, October 13, 2010

Start-up, Run-up & Pre Take-off Check Lists

Start Up Check List (C-150)


Set the brake peddles. Set all electrical switches to OFF. Set the fuel selector switch to ON (full to the left). Turn on the beacon. Set the seat in the correct position to comfortably operate the rudder and brakes (take extra care - you can't easily re-adjust in flight) and make sure it is locked in position. Unlock the primer and pump one full cycle. Set throttle to CLOSED if cold or open 1/4" if warm. Set mixture to rich. Turn both master switches to ON. Visually check to see that the prop area is clear, open window and shout "CLEAR!" Turn ignition key to start. Raise flaps all the way back to 0 degrees. Check the oil pressure gauge, pressure should be rising. Turn the electrical switches on (lights as needed) and the radios on.

Check the weather via the automated weather station (135.12 MHz at Pearson Field). Verify ceiling and visibility and determine which runway to use. Visually the windsock is pointing to the correct runway.

Taxi to the chosen runway and stop in one of the Run-up circles.

Run-Up Check List
Set the brake peddles. Check that the fuel switch is set to the ON position. Set the trim to TAKE-OFF position. Check that the controls are free and correct: rudder, ailerons and elevators. Check and set instruments: compass and Nav. Set mixture to full rich and increase the throttle until the engine is revving at 1,700 RPM. Turn the magneto selector to single and watch for a drop in the amp gauge. Pull carburator heat to full on position, check for a drop in RPMs, and return to the closed position. Check the gauges to see that everything is in the green (oil temp, oil pressure & amps). Check the range on the vacuum. Set throttle to idle. Check that the primer is locked in position. Set radio frequencies.

Taxi to the hold-line and visually check for planes on approach. If clear procede to centerline and set brakes.

Pre Take-off Check List
Set flaps as required (VUO elevation - flaps are set to 0 degrees). Set mixture to rich. Final set the directional gyro. Turn on the transponder. Check that all doors, windows and seat-belts and secured. Start the clock. Verify the take-off speed for the aircraft.

Full throttle, steer with the rudder pedals, wait until it reaches take off speed, slight pull back on the yoke and the plane will essentially take-off by itself.

Monday, October 11, 2010

Practicing with Flight Simulator X

VUO Runway 8, ready for take-off.
Ever since my first real flight lesson, I've been performing more realistic simulations using MS Flight Simulator X. I had not utilized the full extent to which it recreates the complete flying experience before. It's really great practice.

I can generate a flight plan (i.e. Pearson to Scappoose), check the weather, talk to ATC, run through the start check list, taxi to the selected runway, perform the run-up and take-off check lists, take-off and fly to destination and back using the same visual landmarks...i.e. water towers, lakes, smokestacks, railroads/rail yards, etc. In flight I can recreate the pitch, power and trim exercises as well as keeping proper altitudes, etc. I'm hopeful it will help keep me proficient when I'm too poor to fly the real thing as often as I'd like to.

Thursday, October 7, 2010

Second Flight, First Real Lesson

Today was my first real full lesson and I scheduled a 2 hour block of time with my flight instructor. I'm continuing my training with Theresa and she is now my official instructor. This was also my first official plane rental which took at little extra time...but now I'm in the system it will be painless from now on, especially now that I have access to the online scheduling system for renting planes and instruction times. Before we checked out our C-150, Theresa showed me how to review the maintenance logs to see if there were potential problems with the plane that would make if unsuitable for training flights...we're all good.

Restricted airspace around PDX.
Pre-flight Briefing
We reviewed the navigation map and discussed today's flight plan. Being as close as we are to Portland International Airport (PDX), flight is very restricted. It's all about altitude. On the map to the right you can see 2 concentric circles; the inner circle belongs to PDX from the surface up to 4,000 ft. The little pie shaped wedge in the NW quadrant is the airspace exception for Pearson (VUO) up to 1,100 ft. PDX owns the outer NW quadrant from 1,800 ft to 4,000 ft. Outside the circle is unrestricted air space. Theresa uses Vancouver Lake and a distinct pair of  lakes as markers for elevation restrictions on NW departures and approaches. We talked a bit about the pre-flight walk around we would perform to ready the plane for flight. Mostly to advise me that the check list provided for the walk around is not well organized and Theresa suggested I create my own version of the check list to make it more efficient and better suited to my own personal quirks.

Today's Cessna 150.
Walk Around
We headed out to the tarmac to inspect our aircraft. Normally, a walk-around will take around 15 minutes, today was my first, so it took about 45 minutes to complete the walk-around this time. We use a little half-sheet sized check sheet to guide us around the eight general check points.

The cabin well.
First stop is the cabin. After stashing our stuff behind the seats, we begin our inspection. We're checking to see if the seat rails are clear and there is nothing loose rolling around on the floor of the cabin that might interfere (we found an empty coffee cup). Same check of the pedal area. Turned on the Master Switch and checked that the gauges were working and lowered the flaps all the way. Turned on all of the navigation lights and walked around the entire aircraft, making sure they were all working properly.

The rudder actuator.
Second check point is the tail or empennage (is that French for ass-end?). As we walk towards the tail we're looking for popped rivets or lose screws on inspection panels. After untying the tail tie-down, we inspect the control surfaces, by simply grabbing hold a moving them through their full range of motion. We are looking for any binding or other interference with smooth movement. We check the connections and actuators to see if everything is bolted and secured.

Spill test. Note water puddled in the
middle...not what you want to see.
Third and fourth inspection points are the trailing edge and leading edge of the right wing. After disconnecting the tail tie-down, we inspect the right flap by making sure it is locked in place and don't move in the direction of airflow when you push on it. We also inspected all of the connection points, piano hinges in this case, and the actuator to see if was binding.  Next is the aileron, same connection checks as the flaps, but this time also inspecting the full range of motion (grabbing and moving by hand). We inspected the wingtip light fixture. Moving around to the lead edge, looking for fresh damage.We used a special cup and drained a small amount fuel from the bottom of the wing tank to see if it was contaminated in any way.

Very simple dipstick for checking
fuel quantity.
The aviation fuel is tinted blue, if other fuel types are mixed it changes to clear. Water being heavier than aviation fuel, you would see a layer of water under the layer of fuel. Theresa added some water so I could see how it's not supposed to look. Another option is to drain some fuel onto the tarmack and check for water in the fuel that way. We checked the amount of fuel in the wing tank, as we need to make sure we over 1/2 full before flying. The right wheel assembly wraps up this inspection point. Tire wear and pressure, brake pads, rotor and finally the bolt holding the wheel on.

The engine...well the back of it.
Mostly avionics leads and the
battery and oil cap/dipstick.
Fifth inspection point is the nose. Popping open a tiny little hood panel on the engine, we check oil and drain the fuel strainer...plus lots of looking around for loose leads and wires. After checking the engine cowling, we "petted" the propeller, as Theresa likes to put it. Inspecting the leading edge for nicks or cracks by rubbing the palm of the hand along the length of it (its all covered in bugs too, ew!), then rubbing the palm of the hand along the back side of the blade, looking for the same. Inspecting the spinner (the cone that covers the prop mount) for secure connections and the air filter for debris. Finishing with the nose wheel: tire wear, tire pressure and checking the shimmy suppressor - a device that stops the front wheel from performing like a busted shopping cart.

Final inspection points are the left wing leading, trailing edges. Essentially the same as the right wing inspection with the addition of checking the air speed indicator pitot, the stall warning (a whistle that blows when air is moving the wrong way over the wing), and the fuel vent opening.

Flight Number 2
We climbed in and ran through the pre-flight and start check lists which I'll detail in future posts. After checking the wind sock to see which runway to use it was time to start driving. I taxied to runway 8, which was kinda hard. The steering is all feet and so are the brakes, it is not easy to get used to, that's for sure. I even rode one wheel into the grass on my way. Theresa says it only takes a few times to get used to it...I hope that's true.

Stopping in the staging area, we performed the Run-Up and Pre-Takeoff check lists. I taxied onto the runway and realized Theresa was going to let me take-off. Oh boy. Afterwards I can see why...take-off is really easy. No hands even. Just steering with the rudder pedals and a slight pull back on the yoke when it gets to 50 mph or so. The trim setting just lifts the aircraft gently at the correct angle.

Our flight took us out towards Scappoose again and I was at the controls almost the entire time. Theresa ran me through some Pitch, Power and Trim exercises. We buzzed the air field at Woodland and I practiced a few rudder assisted turns, but as our inspection was so long this time, we were soon headed back to the barn.

Theresa has been getting me familiarized with all the landmark references that pilots use for visual navigation all the time we've been flying. To approach runway 8, I simply followed railroad tracks right to the runway...nice and easy. Theresa walked me through the approach and I was hands on all the way in until we were just about to land, then she was in control and landed the aircraft. I would guess that during the entire ~50 minute flight, Theresa had the controls for barely more than a minute - I was in control the rest of the time; that's why there aren't any pictures after the walk-around - I was too busy flying!

Afterwards I purchased my own C150 Aircraft Check List ($8.00) and current aeronautical map ($9.75). Now I can practice some of this stuff on my home simulator.

Hours of flight logged this lesson: 0.8 Dual Received (DR)
Cost of this flight lesson, checklist and map: $158.22

First take-off!

My instructor let me take-off by myself already! Homer says "Woohoo!" Gotta get back to work now...I will post details & pics of todays lesson later on this evening...just kinda excited about today's flight and wanted to share.

Tuesday, October 5, 2010

Flying Goals

The current list of things I'm looking forward to achieving in civil aviation:
  • Private Pilot's License - hopefully by the end of Summer 2011. Wish me luck!
  • Instrument Rating - allows me to fly in zero visibility and at night. Maybe sometime in 2013?
  • Float Plane Qualified - not even sure how you go about this, but how frakin' awesome would that be!
This looks to be quite the fun adventure. I'm looking forward to my first vacation that I fly myself to.

A word about video games

Flightgear Screenshot
I have spent a lot of time playing a variety of computer games that are essentially a form of flight simulator. Some of these are actual flight simulators that focus on civil aviation, but for the most part they are air-combat simulators. On the civil aviation side the two programs I've used a lot are Flightgear - a free, open source sim that is available for Wintel/Mac/Linux platforms, and Microsoft Flight Simulator X. On the air-combat side, there are some that are more arcade style and others that are more simulator. Of the more realistic ones, I play Targetware,  IL2-Sturmovik and Wings of Prey. All of these simulators have accurate physics and can be set to high degrees of realism. Not only flight but engine management, instrument reading and navigation. Both Flightgear and MS Flight Simulator X have realistic terrain and real world airports with correct runway configurations and lighting. Flight Simulator X even has accurate significant landmarks like bridges and radio towers.

Flight Simulator X Screenshot
By the time I took my first real flight from Pearson Field, I had simulated the take-off and landing dozens of times from the same runway. The view of the Interstate Bridge and the Columbia River were exactly the same. It was almost anti-climactic. In the big picture, I'm glad to have had so much practice. I was able to concentrate more on learning and watching my instructor.

There was a bit more turbulence than expected, the simulators played at home don't have motion control. The flight physics were the same and the yoke was so sensitive, it actually took less physical effort to fly than using my Saitek X-45 joystick/throttle set-up at home.

The plane I fly most in Simulator X is a sightly larger version of the plane I flew (C172 vs C150). The instrument layout is almost identical and the views out of the cockpit were eerily familiar. My instructor seemed pleased that I could adapt to using a light touch (vs the death-grip that most beginners apparently have on their first flight) so quickly.

I fully credit my obsession with video games for such a great first flight experience.

First Flight, First Post

So yesterday, after many years of procrastination, I took my first flight lesson. It is something I have wanted to do my entire life. I've always had a big fascination with planes, especially historic WWI & WWII fighters and the like. I've been to airshows and air museums, I love movies and videos games that involve air combat and even built scale models for a while. But now, I'm doing it for realz.

Sunday morning: excitement turns to frustration as the instructor calls me 15 minutes before scheduled flight time to say the weather is too bad for an introductory flight and we postponed the lesson 24 hours.

Theresa fuels our Cessna 150
The next morning I arrived at historic Pearson Field Airport, the longest continuously operating airfield in the US, to take my lesson. My instructor, Theresa Nelson, pulled our Cessna 150, up to the fuel pumps outside the office and I walked on out to get in. The cockpit looked SO small. A C150 is a tiny little aircraft. After fueling, we pushed it back outside the safety circle around the fuel pumps...the plane is really light too. I was starting to get nervous. I was expecting the aircraft to be a little more, well...substantial.

The tiny looking cockpit
I got my headset on and Theresa fired up the engine. We went through the engine pre-flight and started taxiing to the runway. Theresa surprised me by letting me taxi for a short distance, steering with the rudder/brake pedals.

We stopped at the hold-line and checked to make sure no one was on final approach. Then we were in position on the centerline, applying full throttle...the C150 is light and starts lifting at 45 mph...and in no time at all we're airborne. We turned around downtown Vancouver and Theresa flew us right over my house...I was so excited I forgot to snap a photo. You see, I live around six blocks from Pearson Field and one of the approaches takes small aircraft over my house all day long...it's parallel to the airfield and is the point where pilots cut throttle and begin to apply flaps, starting their slow turning descent towards the runway.

Flying over Clark College
We then turned NW towards Vancouver Lake and Sacappoose beyond. Theresa let me take the yoke and start piloting the aircraft all by my lonesome. She showed me how to trim the aircraft so it would fly level when you let go of the yoke. I then climbed to 1,500 feet, leveled out, trimmed the aircraft and flew along for a while. As we were getting ready to turn around, Theresa started showing me how to make neater turns using the rudder. I then turned us back towards Vancouver Lake and the airfield and began descending to1,000 feet. After passing over the lake, Theresa took the controls and we got ready to start our approach. Now I could finally take a moment to a snap a photo.

We came in for a smooth landing and taxied over to where the planes are parked next to the hangers. Theresa  demonstrated how to tie the knots on the tie-down ropes. Remember, the C150 starts flying at 45 mph, so a strong gust could flip all the planes on the tarmac if they weren't tied down. There is also a pin-lock on the yoke to keep the ailerons from flapping in the wind.

My Pilot's Logbook
Theresa filled out the first entry in my new Pilot Logbook ($13.49) and explained my next steps. So from here on out, it's mostly all about the flying. Each lesson currently costs around $180 (cost goes up a bit as the planes get bigger) and will  result in approximately one and a half hours of logged flight time. Today's intro flight was $65 and lasted just over a half hour. It takes around 12 to 15 hours to be ready to solo. I start the six-week ground school in January at a cost of $520 for course, books and materials. The total cost to get to get the minimum hours required by the FAA (40) for a pilot's license is $5,335. Actual estimated cost is $8,500, more if you take a long time learning stuff. I hope to get a few more flights in before the weather turns too ugly and then will resume flying in the spring after completing ground school.

Update: Next flight scheduled for 8:30am this coming Thursday...I think I got the bug!

Hours of flight logged this lesson: 0.6 Dual Received (DR)
Cost of this flight lesson and logbook: $79.60